."

Thursday, December 22, 2011

Homemade Dog and Cat Treats

Today you get a two-fer, though the recipes might not be what you usually expect to see on this blog.  Today we're making some homemade treats for our furry friends!  If you're anything like me, you think of your dog (or cat, if you have one) as more of a family member than just a pet.  And don't our family members deserve some home-baked goodness every now and then?  I think so.  Which is why I decided to bake up some treats for Maeby, my parents' dog, and my in-laws' dogs and cats for Christmas.


The recipe for the dog treats was found on the blog Brownie Bites, and the recipe for cat treats was found on this site.


You'll need:


Dog treats


1 cup whole wheat flour
3/4 cup uncooked oats
1/4 cup peanut butter
1/2 cup water
1/4 cup vegetable oil
2 tbs honey
1 tsp baking powder


Cat treats


6 oz. can tuna, undrained
1 cup cornmeal
1 cup flour
1/3 cup water


Both dog and cat treats bake at 350 degrees F.  But let's start with the dog treats first.


Dog treats: Stir dry ingredients together in a bowl.  Add the wet ingredients and blend well.  Roll onto a smooth surface sprinkled with flour to keep from sticking.  Roll until the dough is about 1/4 inch thick.  Cut into shapes using cookie cutters (check out how cute mine are!) and arrange on a greased cookie sheet.  Bake for 18-20 minutes.  Cool completely and store in an airtight container.


Cat treats: Mix all of the ingredients together into a ball.  Roll the dough out onto a smooth surface until it is about 1/4 of an inch thick.  Cut into treat-sized pieces (this is a little subjective... but do whatever you think looks right).  Place on a greased cookie sheet, and bake for 20 minutes.  Allow to cool completely.  These should probably be stored in an airtight container in the fridge, because of the tuna.


I made the dog biscuits using these super cute cookie cutters, purchased at Michael's.  


Admittedly, the dog treats turned out looking much better than the cat treats... but what can you do?  I'm sure they'll taste good to the cats (I hope!).


Both of these recipes take almost no time to throw together.  I can't vouch for how much cats will enjoy their treats, but Maeby loved the dog biscuits!  She is the head taste tester here at Hey, who cut the cheese?, after all! 


Om nom nom nom...
Please don't forget your furry friends this holiday season =)   

Sunday, December 18, 2011

Chocolate Covered Pretzels

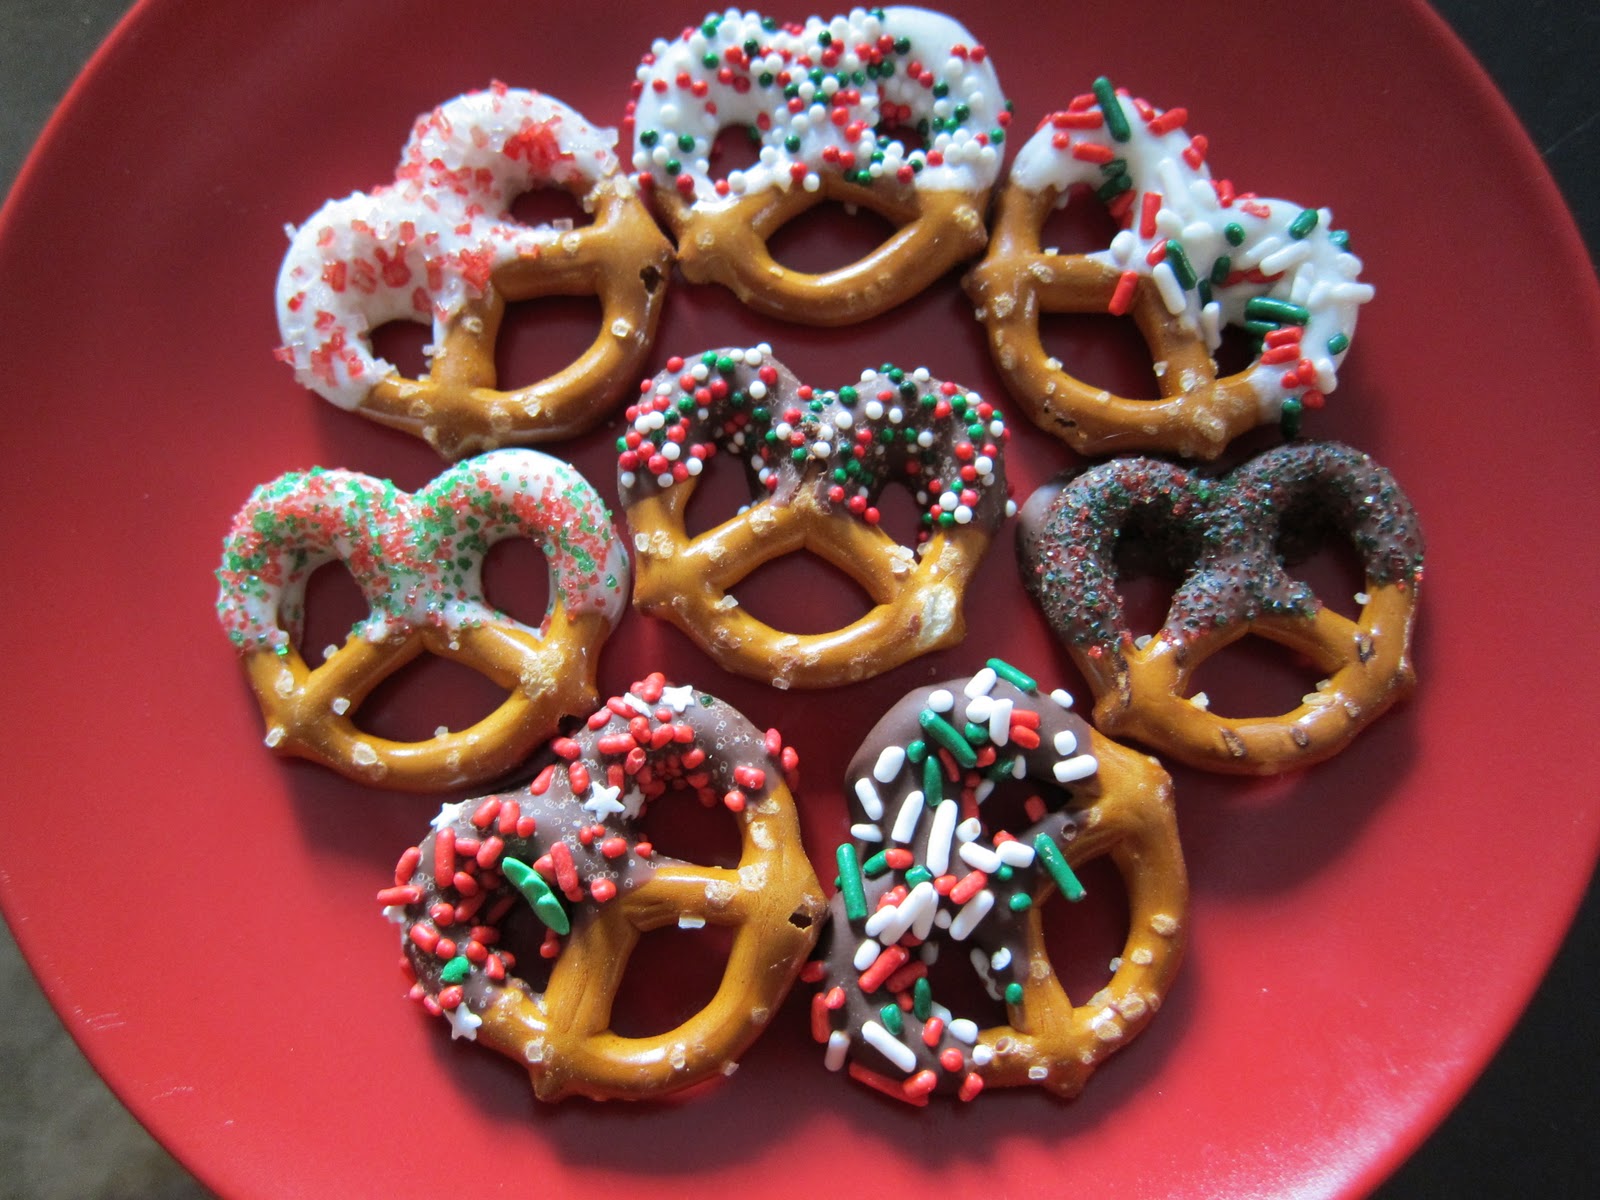
 Festive chocolate covered pretzels, at that.  =D I don't really think any one person can lay claim to the chocolate covered pretzel, so I can't attribute the inspiration for this post to any particular person/blog.  However, I did happen to see some super cute chocolate covered pretzels very recently, posted by Kim, on the blog Feed Me, Seymour.  Please swing by her blog if you haven't done so already.  You'll be happy that you did!


Every year during the month of December (and sometimes a little earlier than that) I become acutely aware of the fact that the holidays are approaching.  I mean, aside from seeing nonstop commercials and ads and whatnot, I start to feel Christmas-y.  That hasn't happened yet this year.  I obviously know that Christmas is 1 week away, but I'm still not feeling it.  Maybe it's because the weather has been pretty warm lately, or maybe it's because I've just been busy with school and have only recently been able to pull my head out of my ass.  Who knows.  Regardless, I'm not feeling the holiday spirit quite as much as I'd like.  That's where these chocolate covered pretzels come in.


Sean was out of town this weekend, so I took that as my chance to spend (probably) too much time in the kitchen.  Perhaps some baking would help put me in the holiday mood?  It did... a little.  Cranking up the holiday music and helping some friends decorate their tree helped too. =)  These chocolate covered pretzels are really easy to make, and look pretty impressive, or at least I think that they do.  You can use different colored sprinkles for different holidays, too.


You'll need:


chocolate chips/chunks (whatever kind you'd like)
pretzels
assorted sprinkles


Melt your chocolate chips in a double boiler, or, do like I did.  Place them in a glass bowl and microwave in 30 second increments, stirring frequently.  You can add a little butter or a smidge of vegetable oil to the chocolate too, if you like.  I added a little bit of vegetable oil.


Dip pretzels in chocolate, allow excess chocolate to drip off, and apply sprinkles!


It's that easy. =)  Let them cool and the chocolate set.


I would, however, make a few recommendations: 


1) Put some parchment paper on a cookie sheet.  It will provide a relatively non-stick surface on which your pretzels can dry.  


2) For the love of all things holy, apply the sprinkles to the pretzels over a baking dish.  Otherwise you're going to have a mess on your hands.  I used a 13x9 Pyrex dish.


3) If you use milk chocolate chips or chunks, put the cookie sheets in the fridge while the chocolate sets up.  Otherwise it will take a really long time to set up (or at least mine did).


I used milk chocolate and white chocolate chips.  Although I'm a bigger fan of eating milk chocolate, I thought that the white chocolate ones came out looking better.  It's easier to see the sprinkles against the white chocolate background, and white is more festive than the milk chocolate.
Here's the whole assortment =)


Pretty cute, huh?  Plus check out the adorable penguin bowl I have them sitting in!  I couldn't resist.  Whip some up for a holiday party, for friends, or just for yourself.  Enjoy! 

Monday, December 12, 2011

Creamy Orzo "Risotto" with Butternut Squash

With this being a perfect recipe for Meatless Mondays, I really should have posted this yesterday, but I was on the road for most of the afternoon, and then really didn't feel like doing much of anything once I got back to Bmore.  So here it is, a bit late.  This is another Weight Watchers recipe, and I've modified it slightly.


Although the original title of the recipe indicates that it's a risotto, it really isn't.  But it's a good, far less labor intensive mock risotto.


You'll need:


Cooking spray
1 small-medium butternut squash, cubed
1/2 tsp olive oil
salt and pepper, to taste
1 tbs unsalted butter
1/2 onion, chopped
1 clove garlic, minced
1 cup uncooked orzo pasta
1 1/2 cups water
1 cup chicken broth
1 tsp dried thyme
1/3 cup parmesan cheese, shredded
salt and pepper, to taste


Preheat your oven to 425 degrees F.  Line a baking sheet or two with foil and spray the foil with the cooking spray.  Put your cubed squash and olive oil in a gallon zip top bag.  Season with salt and pepper.  Seal the bag and toss everything around until the squash is well coated.


Put the squash on the baking sheet(s) in a single, even layer.  Roast in the oven for 20-25 minutes, tossing halfway through until the squash is tender and lightly browned.


Meanwhile, melt the butter in a saucepan over medium heat and add the onion and garlic.  Sautee until the onion is translucent.  Add the orzo.  Stir constantly until the orzo begins to smell toasty.  Add the water, broth, and thyme.  Bring to a boil.  Reduce heat to low and simmer, uncovered for about 15 minutes or until all of the liquid is absorbed.  Stir occasionally.


Stir in the cheese and roasted squash.  Season well with salt and pepper.

It's really nice and creamy, despite not having to go through the whole ordeal of constant stirring.  The saltiness of the cheese and sweetness of the squash contrast with one another nicely.  Enjoy! 

Wednesday, December 7, 2011

Easy Roasted Acorn Squash

On a note completely unrelated to the contents of this post: This blog's Facebook page finally has enough people "liking" it that I could assign it an actual username!  This is pretty exciting for me.  Ahh, the little things in life...  At any rate, if you use Facebook and get some enjoyment/amusement out of reading this blog, please swing by http://www.facebook.com/HeyWhoCutTheCheese and "like" the page if you haven't already.  Thanks!


Now, to the recipe.  I love squash.  Butternut, spaghetti, acorn, pumpkin (hello?! my family had to plead with me to stop making pumpkin-based recipes)...  you name it; I'll likely eat it.  In addition to them being pretty delicious, it's nice to be able to eat foods that are in season.  Not that I adhere to this principle really strictly, but it's still nice.


Recipes like this can be found all over the place, but you can use this recipe as a template if you'd like.  I don't really use any strict measurements, so feel free to play with it until you arrive at something you like.


You'll need:


1 acorn squash, halved with seeds and guts scooped out
~1 butter
~1-2 tbs brown sugar
maple syrup
salt


Start by preheating your oven to 400 degrees F.


This is an acorn squash.


It can be prepared in a variety of ways, but I find that peeling it can be a little tedious, so I always just slice it in half.  


Scrape out the seeds and discard them.  Or keep them and roast them like you would pumpkin seeds.  


Score the flesh of the squash with a knife, being careful to not cut the whole way through.  Spread some butter on each of the halves of squash.  I like to take a stick of butter and just rub the end of that stick onto the squash, using the wax paper wrapper as a handle.  Sprinkle some brown sugar and give each half a drizzle of maple syrup.  Finish the whole thing with a small sprinkling of salt.


Set the squash, cut sides up, in a baking dish with ~1/2 inch of water in the bottom.  The water will help to prevent the squash from drying out while baking.


Slide the dish into your preheated oven and bake for 1 hour - 1 hour and 15 minutes.  Check it after 1 hour, though.  The squash should be very soft and the tops starting to brown.  


Let it cool for a little bit before digging in.  You can spoon some of the syrupy liquid in the base of the squash over the other exposed areas.  It can be served as is in its own built in "bowl".


Acorn squash are sweet on their own, and this sweetness is accentuated by the sugar-butter-maple syrup mixture.  I usually portion out 1/2 a squash per person as a side dish, although I could easily eat an entire squash by myself.  It's that good.  Enjoy!

Monday, December 5, 2011

Blueberry Ricotta Pancakes

Okay so technically my mom made these, not me.  I didn't think anyone would really care about that little detail.  She made them for Sean and me when we were staying at my parents' over Thanksgiving.  My mom had been telling me about them for a while, and now I can totally see why.  They're amazing!   


This recipe was originally seen on an episode of Everyday Italian with Giada De Laurentis.


You'll need:


1 2/3 cups water
1 1/2 tsp vanilla extract
2 cups pancake/waffle mix (yes, the stuff in a box)
1 cup whole milk ricotta cheese
2/3 cup blueberries (frozen or fresh)
melted butter


Using a rubber spatula, stir the 1 2/3 cups water and vanilla in a large bowl.  Add the pancake mix and stir until just moistened, but still lumpy.  Stir the ricotta into the pancake mix, and gently incorporate while still maintaining a lumpy batter.  Fold in the blueberries.


Heat a griddle/cast iron skillet/whatever pan you usually make pancakes in over medium heat.  Brush with melted butter (or I'm sure cooking spray works here too).  Working in batches, spoon 1/4 cup of the mixture onto the griddle for each pancake.  Cook until golden brown, ~3 minutes per side.   
You can serve them with the honey syrup listed with the original recipe, regular old maple syrup (what we did), or whatever you'd like.

These pancakes are very moist, and are really more like crepes, if you must know.  Though we didn't have them this way, I bet they'd be really good with a little lemon zest added to the batter.  The only thing wrong with them is that you don't want to stop eating them!

Sunday, December 4, 2011

Orange Chocolate Stout Cake

Yesterday was my friend Emily's birthday.  Earlier in the week, she had asked if I would mind baking her cake.  Of course I didn't mind!  Baking is great on its own, and I thoroughly enjoy that.  However, baking for a friend is exponentially better.


So last night we went over to her place for some champagne and cake before heading out for margaritas and entirely too much food.  A big "thank you" should go to Sean, too, since he was gracious enough to give me some of his beloved Guinness for this cake.

Sean harassed Lola while we were there, too.  Can't you tell that she's thrilled?
I'd like to thank Evil Shenanigans for this recipe.


You'll need:


1 1/2 cups all purpose flour
2/3 cups cocoa powder
1 tsp baking powder
1/2 tsp baking soda
1/2 tsp salt
1 1/2 cups sugar
1 stick butter, melted
1 cup stout beer (I used Guinness), room temperature
4 eggs
1 tbs orange zest
1/3 cup orange juice (freshly squeezed, please!)
1 tsp vanilla


1 1/2 sticks butter
4 1/2 cups powdered sugar
1 tsp vanilla
1/4-1/3 cup milk


This can be made into a sheet cake (what I did) or into a round layer cake using two 8 inch cake pans.  If you're interested in going the layer cake route and need some guidance, please see the original post.


Preheat your oven to 350 degrees F.  Spray a 9x13 inch pan with cooking spray.


In a large bowl, whisk together the flour, cocoa powder, baking powder, baking soda, salt and sugar.


In another bowl, combine the melted butter, beer, eggs, orange zest, juice, and vanilla.


Pour the wet ingredients over the dry and mix until well combined and no large lumps remain.  Be careful not to over mix.


Pour the batter into the pre-greased pan and bake for 30-35 minutes, or until a toothpick or knife comes out clean once inserted into the center.


Let the cake cook completely.


While the cake cools, start on the frosting.  In a small pan over medium heat, melt the 1.5 sticks of butter until it is nut brown.  Make sure to keep stirring the butter almost constantly. Allow the butter to cool to room temperature.


Beat the butter, powdered sugar, and vanilla until combined.  It's probably going to look pretty clumped up at this point.  Add in the milk, little by little, until you've reached the desired consistency.  Once the cake has cooled you can go ahead and frost it.


This cake itself was fudgey and pretty moist, and not overly sweet.  The orange flavor really came through, too.  The frosting was pretty sweet on its own, but was balanced by the not-so-sweet cake, and the whole thing seemed to go over pretty well!    

Thursday, December 1, 2011

Oreo Chocolate Chunk Cookies & World AIDS Day 2011

Hi everyone.  It's not often that I'll get up on a soapbox in this forum, and I promise to keep it brief.  And I know that this is a food blog, and that HIV/AIDS and tasty food aren't the most palatable combination.  But today is World AIDS Day 2011.  For those of you who do not know me in real life, the majority of my time is taken up by working on my PhD at the Johns Hopkins Bloomberg School of Public Health, where I am extremely interested in  HIV prevention and working to improve the lives and health of persons living with HIV/AIDS.  


World AIDS Day is about raising money, increasing awareness, fighting prejudice, and improving education regarding HIV-related issues.


2011 marks 30 years since the beginning of the AIDS epidemic.  Since 1981, more than 60 million people have become infected with HIV, and more than 25 million lives have been claimed by AIDS.  Currently, it is estimated that 33 million people are living with HIV worldwide, yet only about half of these people know their HIV status.  Not a single country in the world has escaped the devastation of this truly global epidemic.


Please consider joining the effort and doing your part in Getting to Zero.  Your can get involved in a wide variety of ways: Become informed, get tested, be compassionate, donate, and so on.


Alright *stepping off of soapbox and putting it away*.


Actually, one more thing... Not that I've run into this kind of negativity yet (no one cares enough to be negative, hahaha), but if HIV/AIDS prevention is not something that's important to you or if you have some disparaging remark to make, please save your fingers the extra work and keep it to yourself.  K?  Thanks!


Now, to the cookies!


I really wish I had had enough time this week to come up with something World AIDS Day-related... but alas, these cookies are all I have for you.  Next year I'll try to budget my time a little better.  Anyway, I found the recipe for these ridonkulous Oreo Chocolate Chunk Cookies here, at Butter Baking.  Looking at the recipe now makes me want to whip up another batch right now.  If you haven't yet, go check out her blog!  She has some other cookies similar to these ones that look ah-ma-zing too!


You'll need:


2 sticks butter, softened
1 cup brown sugar
1/2 cup white sugar
2 eggs
1 tsp vanilla
2 1/4 cups flour
2 tsp salt
1 tsp baking soda
1 1/2 cups chocolate chips
1/2 cup white chocolate chips
15 Oreos, roughly chopped into ~6 pieces each


Preheat your oven to 350 degrees F and line a couple of baking sheets with parchment paper.  Beat the butter and sugars together using your stand mixer (or handheld electric mixer) until combined.  Add the eggs and vanilla and mix until incorporated.


Mix in the flour, salt, and baking soda on low speed until combined.  Add the chocolate chips and the Oreo pieces and mix until just combined.  Try to resist eating all of the dough right now.  Seriously, it is so so good!  Try it! 


Scoop tablespoons of the mixture onto the parchment-lined cookie sheets and bake for about 10 minutes, or until the edges are just golden.


Honestly, these are some of the best cookies I've ever made and eaten.  They taste like cookies and cream.  Please try them, you won't be disappointed!!

When telling my mom about these cookies, she (in a stroke of genius) suggested that I use those mint-flavored holiday Oreos or Trader Joe's Joe-Joes in place of the plain Oreo cookies to jazz them up for Christmas.  Don't think that I won't be doing that in just a few weeks.