."

Wednesday, February 29, 2012

S'mores Cookies

How have I not blogged about these yet?!?  Seriously.  These cookies are, in a word, amazeballs.


Sean and I visited Adrienne and Matt at their new place in Ohio, and it was requested that I bake up a little something.  As soon as I saw this recipe on The Girl Who Ate Everything, I knew we had a winner.

You'll need:
11 tbs unsalted butter, softened
1 cup brown sugar, packed
1/2 cup granulated sugar
2 large eggs
1 tsp vanilla
1 tsp baking soda
1/2 tsp salt
1 tsp cinnamon
2 1/2 cups flour
1/2 cup semi-sweet chocolate chips
1 cup mini marshmallows
3 regular-sized Hershey's chocolate bars, broken into pieces
1-2 sleeves of graham crackers, broken into squares

Preheat your oven to 375 degrees F.  Line two baking sheets with parchment paper.  

Lay out your graham crackers side by side, as close to one another as possible.  Ideally, they should be touching one another.  Definitely not overlapping, though.  Depending upon the size of your baking sheets and the amount of dough you have/how thick or thin you'd like your cookies to be (if you want thicker, use more dough, if you want thinner then use less dough per graham cracker), you might need to do this on more than 2 cookie sheets.

In a bowl, mix together the flour, baking soda, salt and cinnamon to combine.  Set this aside.

In another bowl, or the bowl of a stand mixer, cream the butter and sugar together until it's light and fluffy.  Add the eggs and vanilla, mix well until combined.

Little by little, add the flour mixture to the egg mixture.  Stir to combine, on low speed.

Fold in the marshmallows and chocolate chips.  You can chill the dough for 1 hour-overnight, if you desire.  I didn't chill mine, and they were phenomenal anyway.

Place tablespoons of the dough on top of the graham cracker squares, about 1 to 1 1/2 inches apart.  Press down on the tops slightly with your fingertips.  

Bake for 5 minutes, then remove from the oven and press Hershey's bar pieces into the dough.  I only had enough chocolate for 1 square per blob of dough.  But feel free to add more if you have it.  

Bake for an additional 5-7 minutes, or until the dough is beginning to turn golden brown at the edges.  Remove to a wire rack to cool.


Try to not eat most of them immediately.  Seriously, these were... amazeballs.  Like I said.  Don't believe me?  Consult anyone who was there that weekend.  They will tell you.  

These cookies tasted just like a s'more that you would create around the campfire.  Even though I'm not a huge fan of Hershey's chocolate in general, I'm of the opinion that you need to use Hershey's for these cookies.  Otherwise it just wouldn't taste like the s'mores of your childhood.  Unless you have some fancy pants family that used Godiva or something around the campfire.   

Anyway, we had a fantastic weekend (that went by too quickly) and these cookies were enjoyed immensely by everyone.  See the photos below for a snapshot into our weekend, and please enjoy the cookies!!

Playing dominoes.

Out to dinner the first night.  Ignore how grody I look.  I was in the car for like 6 and a half hours that day.

Irish car bombs!

Monday, February 27, 2012

Sausage & Kale Mock Lasagna Casserole

So yeah, I suck.  I'm averaging only slightly more than 1 recipe per week in the month of February.  Sorry guys.  I'm in a bit of a rut.


I found this recipe on Kalyn's Kitchen.  Since I'm on a bit of a kale kick lately, I thought it would be a good way to use up a good portion of the gigantic bag that we picked up at the grocery store.  It's definitely a winner.


You'll need:


2 medium-sized bunches of kale (I used ~3/4 of a big bag that I bought at the grocery store)
1 tsp salt (for water to cook kale)
2 tsp olive oil
19.5 oz. tube of Italian sausage
1 jar tomato sauce
1 tsp dried basil
1 tsp ground fennel
parmesan cheese, shredded
2 cups reduced fat mozzarella cheese, grated


Preheat the oven to 375 degrees F.  Spray a 9x12 inch casserole dish (or a pan of comparable size) with cooking spray.  


Add the salt to a large pot of water and bring to a boil.  If necessary, trim the stems from the kale and cut into ribbons.  When the water begins boiling, add the kale and lower the heat.  Boil for 5-6 minutes.  The kale will turn a beautiful bright green.  Drain the kale into a colander and let it sit there and continue to drain while you deal with the rest of the ingredients.  You might want to squeeze it between some paper towels before using to squeeze out some of the remaining water.


While the kale cooks, heat the olive oil in a large skillet over medium-high heat.  Cook and crumble the sausage until it is browned and totally cooked through.  Then add the pasta sauce, dried basil, and ground fennel.  Let it simmer for 20 minutes or so, or until it reduces a bit.


In the casserole dish, layer half of the kale and sprinkle a bit of parmesan cheese on top.  Then add half of he pasta/sausage, and 1 cup of mozzarella.


I did it out of order, but you know... it all works out in the end.
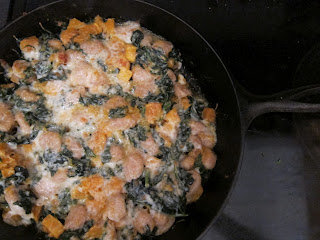
Repeat with another layer of kale, sauce, and cheese.  Cover with foil and bake for 20-25 minutes.  Then remove the foil and bake for an additional 15-20.  The casserole will be bubbling by this point.

Let the casserole sit for about 5 minutes after baking before digging in.

This was excellent.  Before we were even finished eating, Sean asked if I would make it again sometime.  I plan on doing so this week.  It's a relatively guilt free way to get your lasagna fix.  I'd highly recommend it!  Enjoy!

Tuesday, February 14, 2012

Vanilla Ice Cream

I scream, you scream, we all scream for... well, you get it.  I'm bringing you another ice cream recipe.  After Sean and I (it was mostly Sean!) polished off the remainder of our Chocolate Ice Cream, he requested vanilla.  


This is a hybrid of two recipes.  I used the method from this recipe, and the ingredients from this recipe.  

You'll need:

1 cup milk (I used 2%)
2 cups heavy cream
a pinch of salt
3/4 cups granulated sugar
5 egg yolks
2 tsp vanilla extract

In a medium sauce pan, heat the milk, heavy cream, and salt over medium-low heat until you see that it is steaming.  Do not allow it to boil or scald.

While the milk and cream are heating, use an electric mixer to cream together the sugar and egg yolks until they are creamy and fluffy.  They should fall back on to themselves from the beaters in a ribbon.  

Now you'll need to temper the egg/sugar mixture.  Add a little bit of the hot cream mixture to the eggs and sugar.  Using the electric mixer, mix until combined.  Do this a few more times until you've added about 1 cup of the milk and cream to the eggs.

Add the tempered egg and sugar mixture to the rest of the cream.  Continue cooking over medium-low heat until the mixture is thick enough to coat the back of a wooden spoon.

Once the custard mixture has thickened, transfer it to a clean bowl and allow it to cool on the counter for about 30 minutes.  Then cover it with plastic wrap (making sure that the plastic wrap is touching the surface of the custard) and place the bowl in the fridge for at least 3 hours, and preferably overnight.

Then freeze in an ice cream maker according to the manufacturer's instructions.


Not that the chocolate ice cream I made wasn't good (it was very good!), but the consistency of this batch of vanilla was just amazing.  It was so creamy and delicious.  I chalk that up to the mix of ingredients used here.  The ingredients were derived from a David Liebovitz recipe.


As a result... I just bought David Liebovitz's book, The Perfect Scoop over the weekend!  Everything in it looks just amazing, and I can't wait to share some more of the recipes with you!


Enjoy!!

Monday, February 13, 2012

Spicy Pulled Pork

I've been pretty absent lately.  I've probably said this before, and I know I'll say it again: things are really ramping up at school.  My workload is inversely proportional to my level of activity on my blog.  Sorry!  Hopefully this amazing recipe will help to make up for my lack of activity.  I won't beat around the bush now, though.  Let's get to the noms!


This recipe comes from The Pioneer Woman Cooks: Recipes from an Accidental Country Girl, by Ree Drummond.


You'll need:


1 5-7 lb pork shoulder
1 onion, quartered
1 tbs chili powder
1/2 cup brown sugar
4 cloves garlic, peeled
1 tsp dried oregano
2 tsp ground cumin
1-2 tbs salt, to taste
freshly ground black pepper, to taste
3 tbs olive oil
2 tbs white wine vinegar (I used apple cider vinegar)


Begin by preheating your oven to 300 degrees F.  Combine all of the ingredients (minus the pork) in a food processor.  Pulse until everything is totally combined.  


Pour that mixture over the pork.  Rub it into the meat, making sure that you get into all of the nooks and crannies.  Place the pork in a roasting pan or Dutch oven.  Add 2 cups of water.  Next time I'll try adding some beer, too.  I figure that could only improve the flavor.  Cover and roast for 6-7 hours.  Turn the meat over once every hour.


After the 6-7 hours, test to see if the meat is fork tender.  I'd also recommend breaking out your meat thermometer and making sure it has come up to 160 degrees F.  I'm pretty sure there's no way it wouldn't have by this point.  .


Leave the meat uncovered, and turn the heat up to 425 degrees F, roasting at this temperature for about 20 minutes.  Remove it from the oven and allow it to rest for 15 minutes.


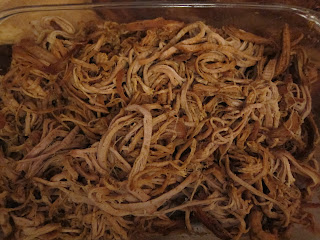
Shred the meat (you can use two forks for this).  If you've moved the meat to a serving platter or other vessel, make sure to pour the pan juices down over the top of the meat.


This pulled pork is so. freaking. good.  I don't know what else to say about it.  The rub/marinade imparts so much flavor to the pork.  It's spicy (not hot spicy, but very flavorful) a little sweet, and oh so tender.

We turned it into quesadillas... and then into sandwiches... and then just ate it on its own.  It's amazing in all of those variations.  It would be good as taco filling, too!  Let your imagination run wild.


This is definitely something that needs to be done on a weekend, or a day when you can work from home, since it requires turning every hour.  But don't let that stop you.  The results are so worth it.  Enjoy!!

Friday, February 3, 2012

Gnocchi with Butternut Squash & Kale

Before bombarding you with more dessert recipes (Think more cookies and homemade ice cream!  Oh yeah, there's more coming.), I figured I'd throw a relatively healthy dinner in there.


This recipe came from Food Network's website.


You'll need:


2 tbs butter
1/2 medium butternut squash, peeled, seeded, cut into 1/2 inch cubes, and roasted until tender
3 cloves garlic, thinly sliced
1/4 tsp red pepper flakes
Kosher salt
1 1/4 cups chicken broth and/or water
1 bunch kale, stemmed and chopped roughly
1 17.5 oz package of gnocchi (I used the whole grain stuff)
3/4 cups Parmesan cheese, grated


Melt 1 tbs butter in an oven-safe skillet.  Add the squash and cook until slightly soft, stirring occasionally.  Add the garlic, red pepper flakes, and salt.  Cook until the garlic is soft.


Preheat your broiler.  Add the chicken broth to the skillet and allow it to come to a simmer.  Stir in the kale and cook until it wilts slightly.  Add the gnocchi and stir to coat.  Cover the skillet and cook until the gnocchi are just tender, takes about 5 minutes. 


Uncover the skillet and stir in 1/4 cup of the cheese and remaining 1 tbs of butter.  Sprinkle the top with the remaining 1/2 cup of cheese.  Transfer the skillet to the broiler and cook until everything is golden and bubbly.  Then dig on in!


Sure, you could probably make this even better for you by cutting back on the butter and cheese, or throwing in some more vegetables, but I thought this was pretty good as is!  Even Sean ate it without saying that it "would be better if it had meat".  Which reminds me, you could definitely add some protein if you felt so inclined.  Enjoy!

Wednesday, February 1, 2012

Hot Chocolate-Chocolate Chip Cookies

So, following the new year, I've been trying to clean up my act.  You know, generally eat better.  Stop scarfing down baked goods like it's my job.  I'm still stuck in a post-holiday food rut.  But still, I'm trying to do better.  Some of the posts might not necessarily reflect that... and frankly neither will this one, hahah.  I was sick for about a week in January, and craving baked goods.  So... yeah.  I caved.  Oh well, sorry guys!  I promise there will be more healthy recipes in the future!


I found the recipe for these cookies on the blog Beantown Baker.  I got about 5 dozen cookies out of this recipe.


You'll need:


3 1/4 cups flour
4 oz. hot chocolate mix (not sugar free)
1 tsp Kosher salt (or 1/2 tsp table salt)
1 1/4 tsp baking soda
2 sticks butter, room temperature
1 cup sugar
2/3 cups brown sugar
2 eggs
1 tsp vanilla
1 cup semi-sweet chocolate chips
1 cup white chocolate chips


Preheat the oven to 350 degrees F.  While the oven is preheating, in a medium bowl, mix together the flour, hot chocolate mix, salt, and baking soda.  Set this aside.


In another bowl (the one in your stand mixer, perhaps?), cream together the butter and sugars until they're light and fluffy. 


Add the eggs and vanilla to the butter/sugar mixture.  Mix until combined.  
  
Add the dry ingredients into the wet, just a bit at a time, until everything is incorporated.


Fold in the chocolate chips.


Beantown Baker recommends that you chill the dough for 1 hour.  I'm sure that doing that would allow the flavors to meld together, resulting in an even more delicious cookie.  I was hasty, and baked them straight away, and they were still really good.


Line two baking sheets with parchment paper, and drop dough by the rounded teaspoon, approximately 2 inches apart.


Bake for about 10 minutes.  Allow them to cool slightly on the cookie sheet before removing them to a rack to finish cooling.

Sorry that the last one came out all yellowish.  Not sure what happened there.  Regardless, these cookies are really good!  They are sure to satisfy any chocolate or carb craving that you might have.  Enjoy!